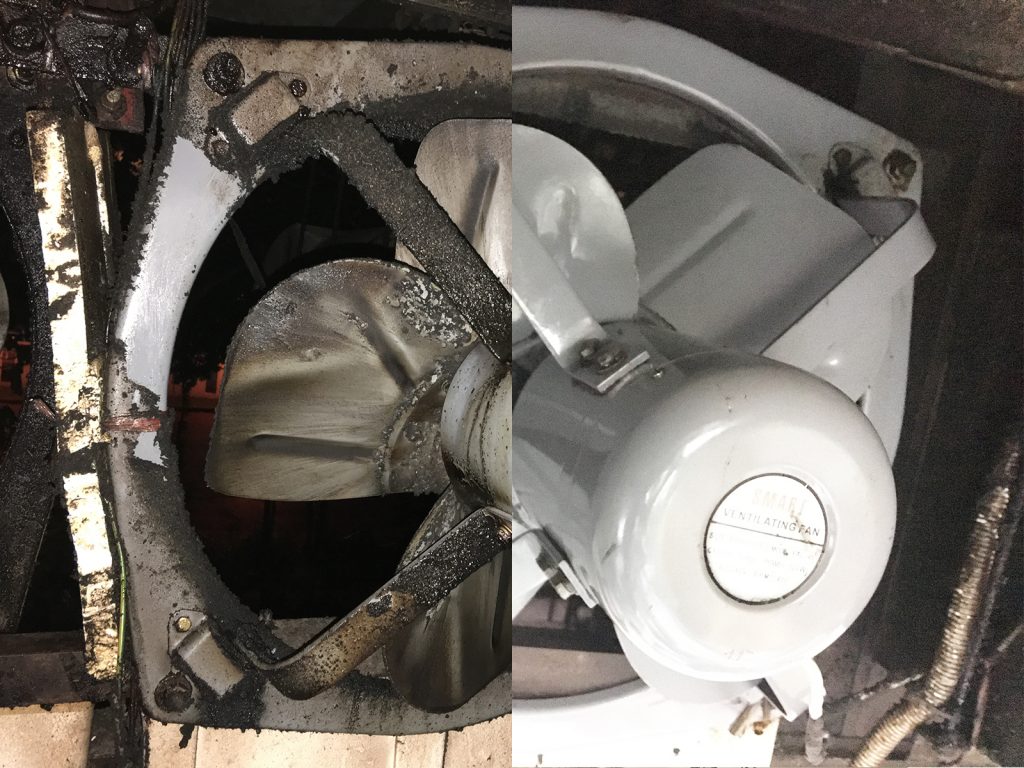
How to Properly Maintain and Clean Your Kitchen Exhaust Fan?
The kitchen exhaust fan plays a crucial role in maintaining a clean and healthy environment in your kitchen. It helps remove smoke, grease, and odors produced during cooking, keeping the air fresh and preventing the buildup of harmful particles. However, to ensure its optimal performance, regular maintenance and cleaning are necessary. In this blog post, we will guide you through the steps to properly maintain and clean your kitchen exhaust fan, enabling it to function efficiently and prolonging its lifespan.
1. Understand the Components:
Before diving into the maintenance process, it's important to familiarize yourself with the different components of your kitchen exhaust fan. The main parts typically include the fan unit, ductwork, grease filters, and the exhaust hood. Understanding how these parts work together will help you better navigate the cleaning process.
2. Create a Cleaning Schedule:
To ensure the longevity of your kitchen exhaust fan, establish a regular cleaning schedule. The frequency of cleaning will depend on your cooking habits, but it's generally recommended to clean the fan at least once every three months. Regular maintenance prevents the accumulation of grease and dust, which can hinder the fan's performance and pose a fire hazard.
3. Turn off the Power:
Before starting any cleaning or maintenance tasks, ensure that the power to the kitchen exhaust fan is turned off. Locate the circuit breaker or switch and disable the power supply to avoid accidents or damage to the electrical components.
4. Clean the Grease Filters:
Grease filters capture grease particles, preventing them from entering the ductwork and clogging the fan. Remove the filters and soak them in warm, soapy water. Gently scrub them with a non-abrasive brush to remove any buildup. Rinse the filters thoroughly and allow them to dry completely before reinstalling.
5. Wipe Down the Fan Unit and Ductwork:
Using a damp cloth or sponge, wipe down the fan unit and the surrounding ductwork. Pay attention to areas where grease and dirt tend to accumulate, such as the blades, motor housing, and interior surfaces. Use a mild detergent or degreaser for stubborn stains, ensuring it is safe for use on the fan components.
6. Check the Exhaust Hood:
Inspect the exhaust hood for any visible grease buildup or blockages. Clean the exterior surface with a damp cloth and a mild cleaning solution. Ensure that the hood's ventilation openings are free from debris to facilitate proper airflow.
7. Reassemble and Test:
Once all the components are clean and dry, reassemble the fan, grease filters, and exhaust hood. Double-check that everything is securely in place. Afterward, restore the power supply and test the fan to ensure it is functioning correctly.
Conclusion:
Proper maintenance and regular cleaning of your kitchen exhaust fan are essential for its efficient operation. Follow the steps outlined in this blog post to maintain a clean and healthy kitchen environment while maximizing the lifespan of your exhaust fan. Remember to establish a cleaning schedule, clean the grease filters, wipe down the fan unit and ductwork, check the exhaust hood, and reassemble everything correctly. By dedicating some time to the maintenance of your kitchen exhaust fan, you can enjoy a fresh and well-ventilated kitchen for years to come.

Comments
Post a Comment